Step-by-Step Guide to Setting Up a Production Environment on AWS for Frappe/ERPNext
Learn how to set up a secure and scalable AWS production environment for Frappe/ERPNext with this step-by-step guide, covering instance setup, networking, and deployment.
Introduction
Setting up a production environment on AWS is essential for ensuring scalability, security, and high availability of applications. AWS provides a robust cloud infrastructure with various services to support deployment, monitoring, and maintenance. This guide walks through the step-by-step process of configuring an AWS production setup, from creating an account to installing Frappe/ERPNext and securing the environment.
Aws setup:
Step 1:
Sign up with an AWS account using your email ID and phone number
Registration link https://signin.aws.amazon.com/signup?request_type=register
based on the video below.
https://www.youtube.com/watch?v=lIdh92JmWtg
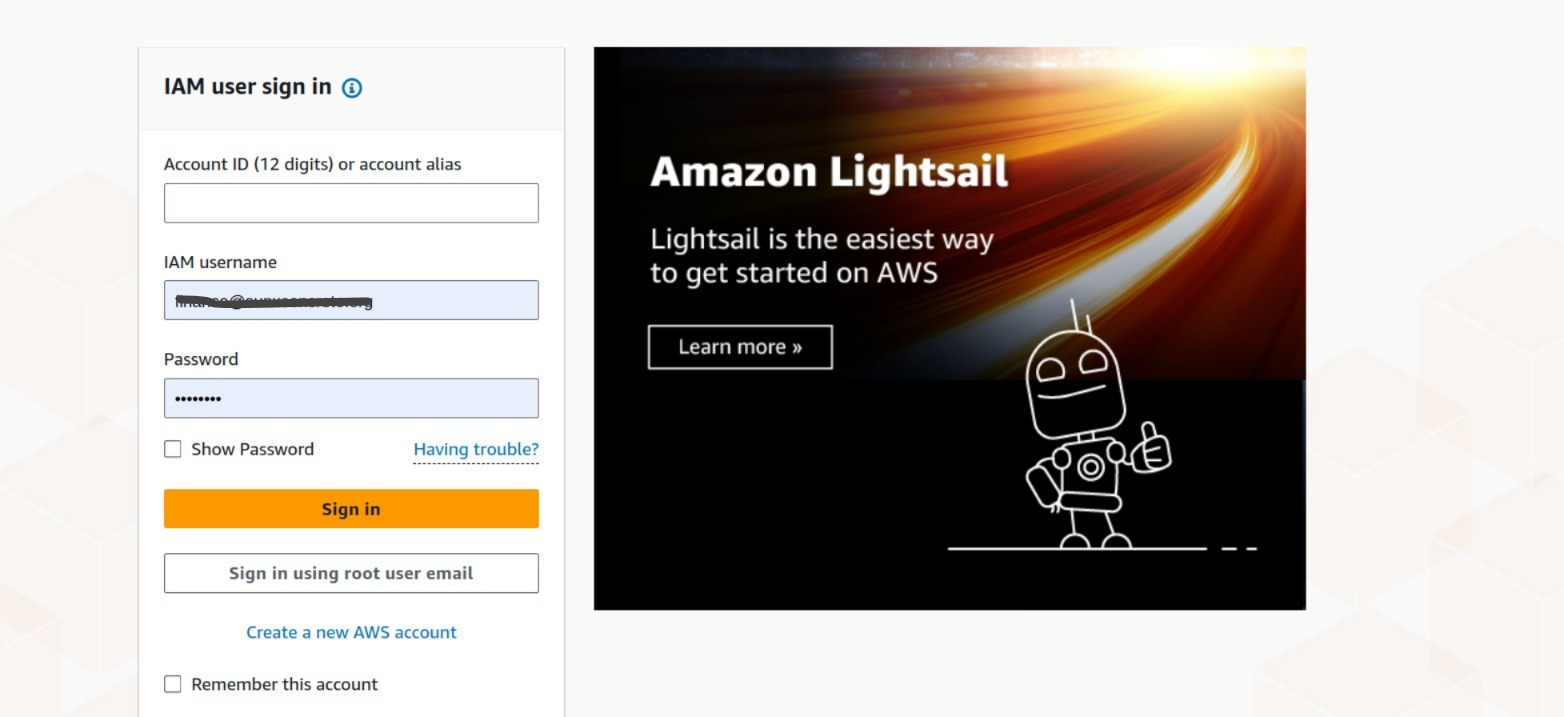
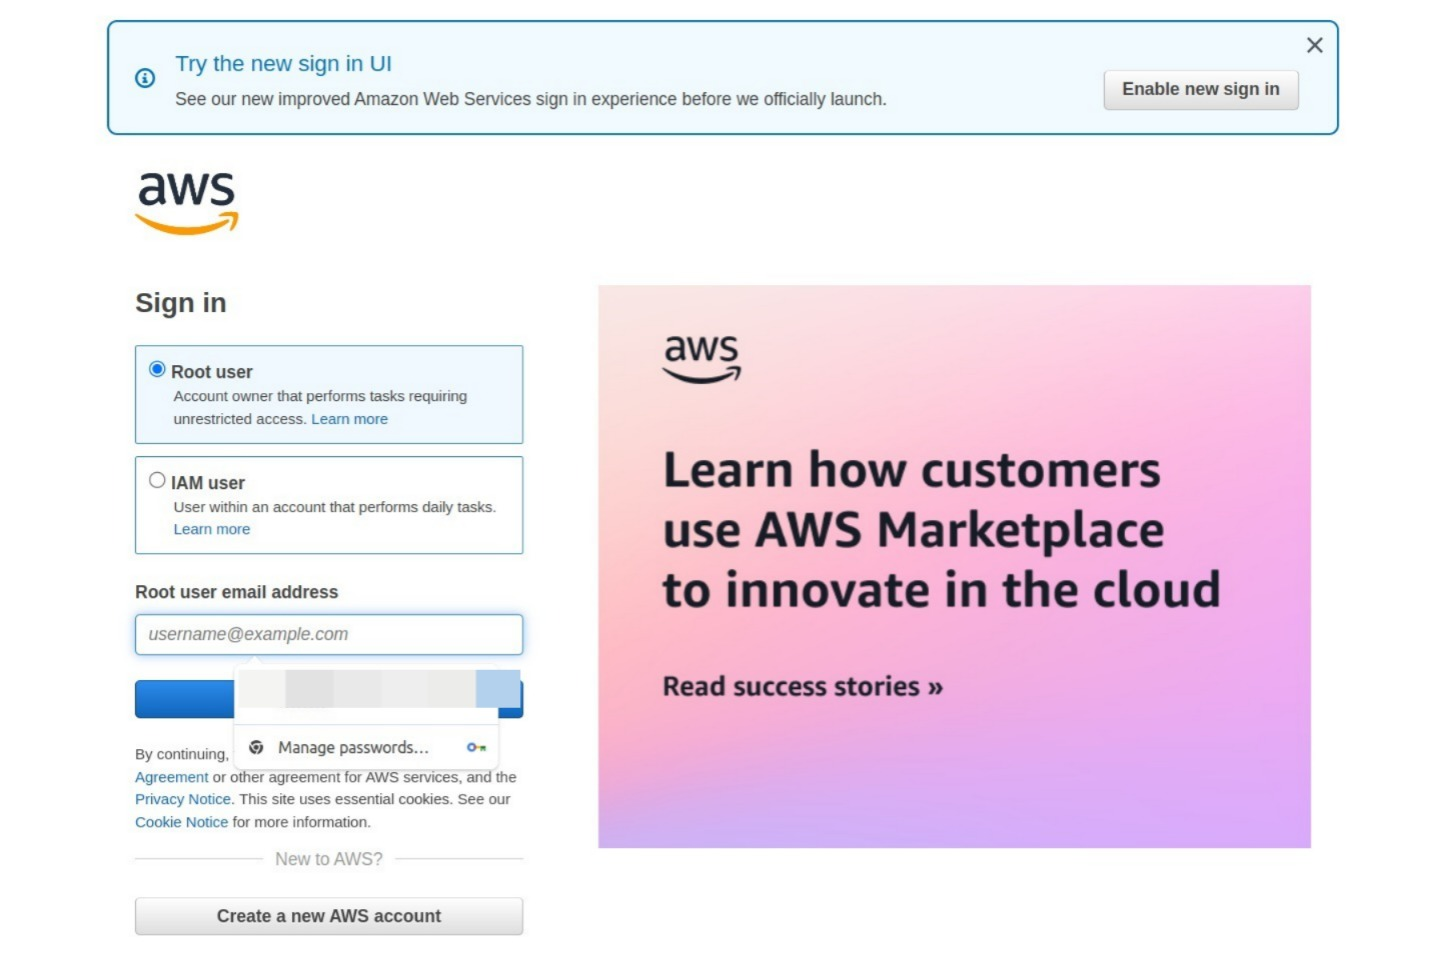
Step 2. After registration login with root user.
- Use your email ID and AWS password to sign in
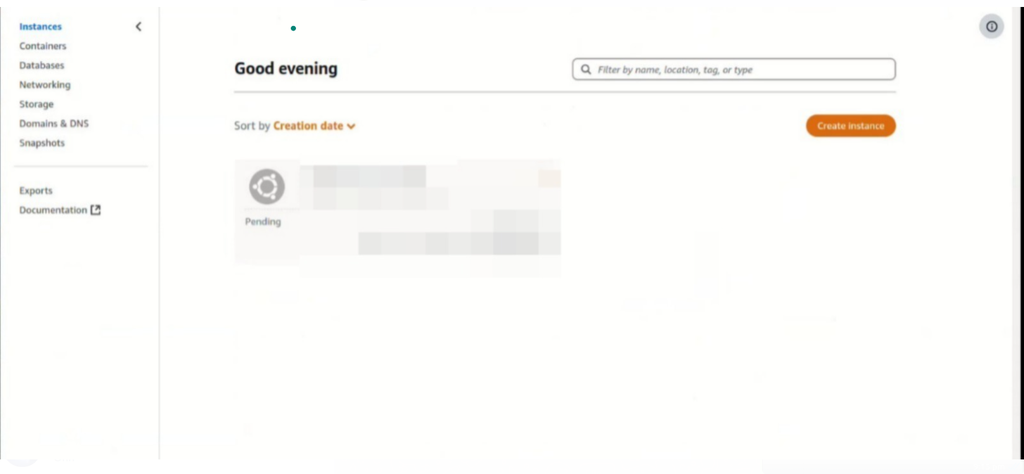
Step:3 creating instance
- On the home page, you can see the link called Lightsail or use the search bar to get the link
- Get into that
- After getting into the link go to the instance and click Create instance
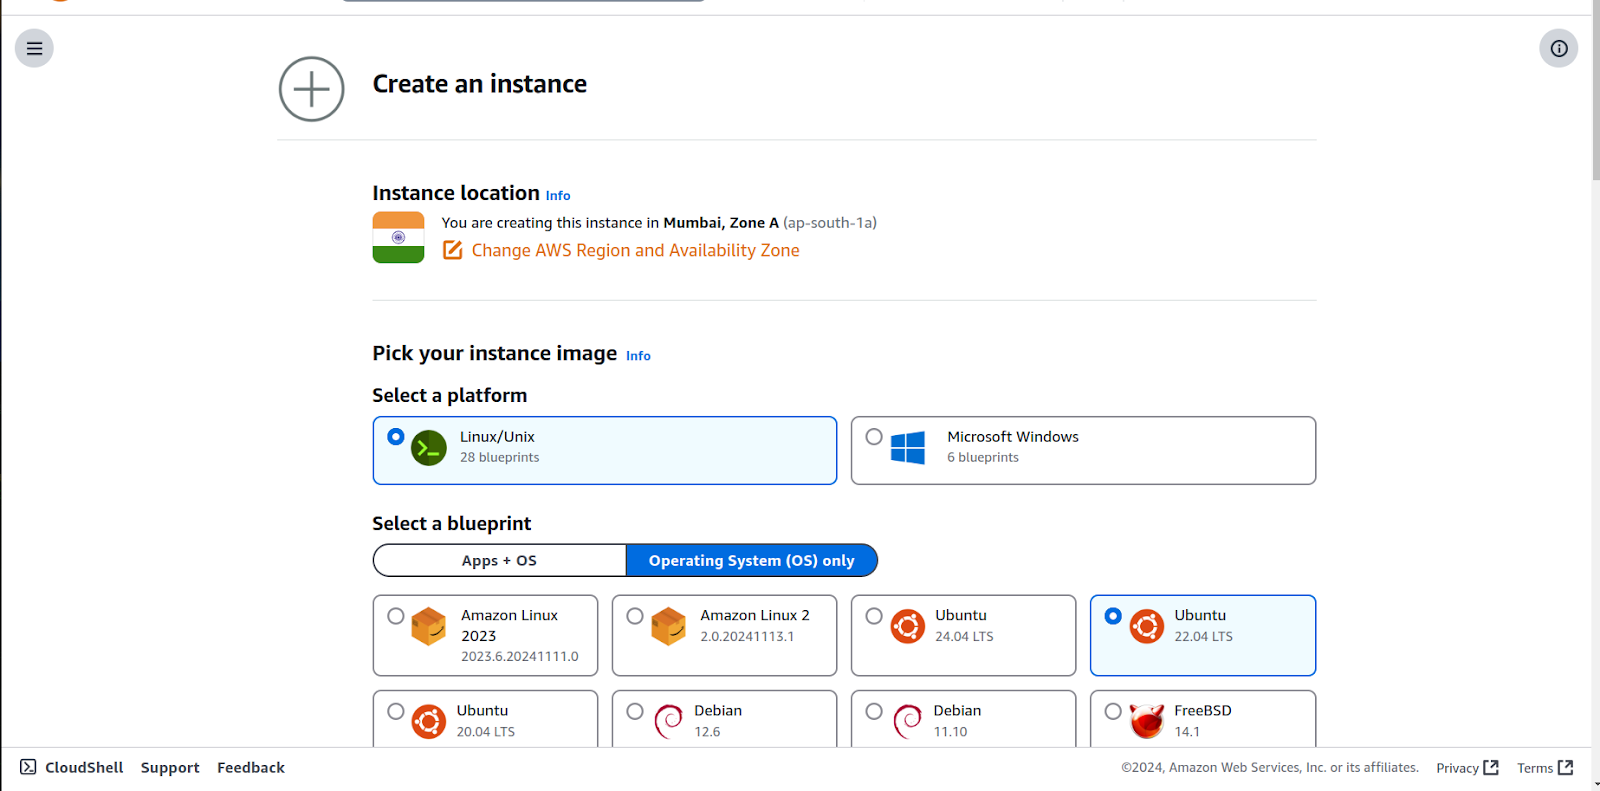
- In this select the instance location
- Select your platform(Linux /windows)
- Select the OS (ubuntu)
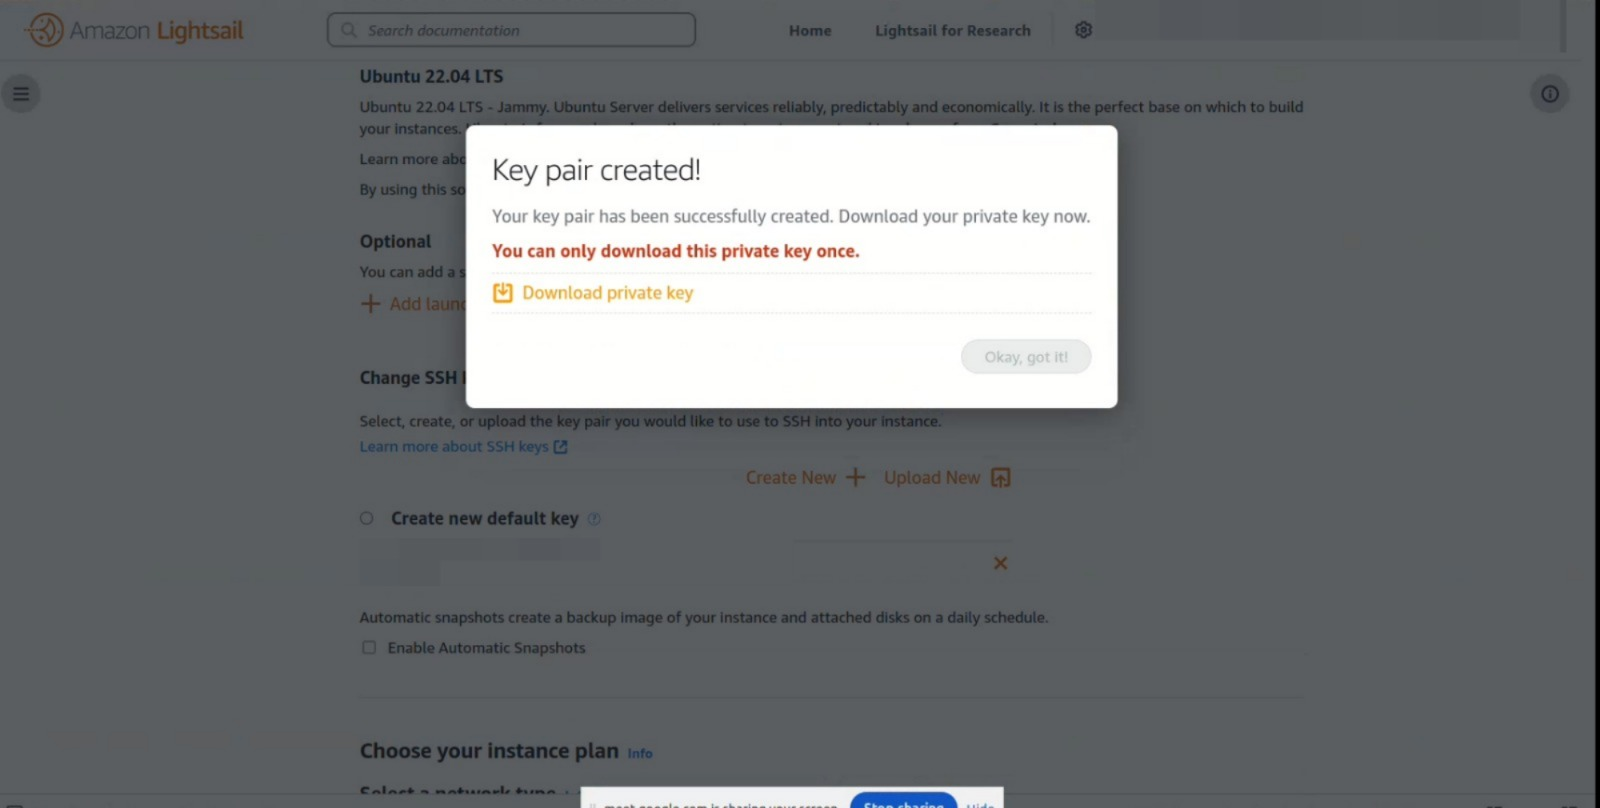
- And add SSH key pair (pem file) (it is a time download so save it in the secure file )
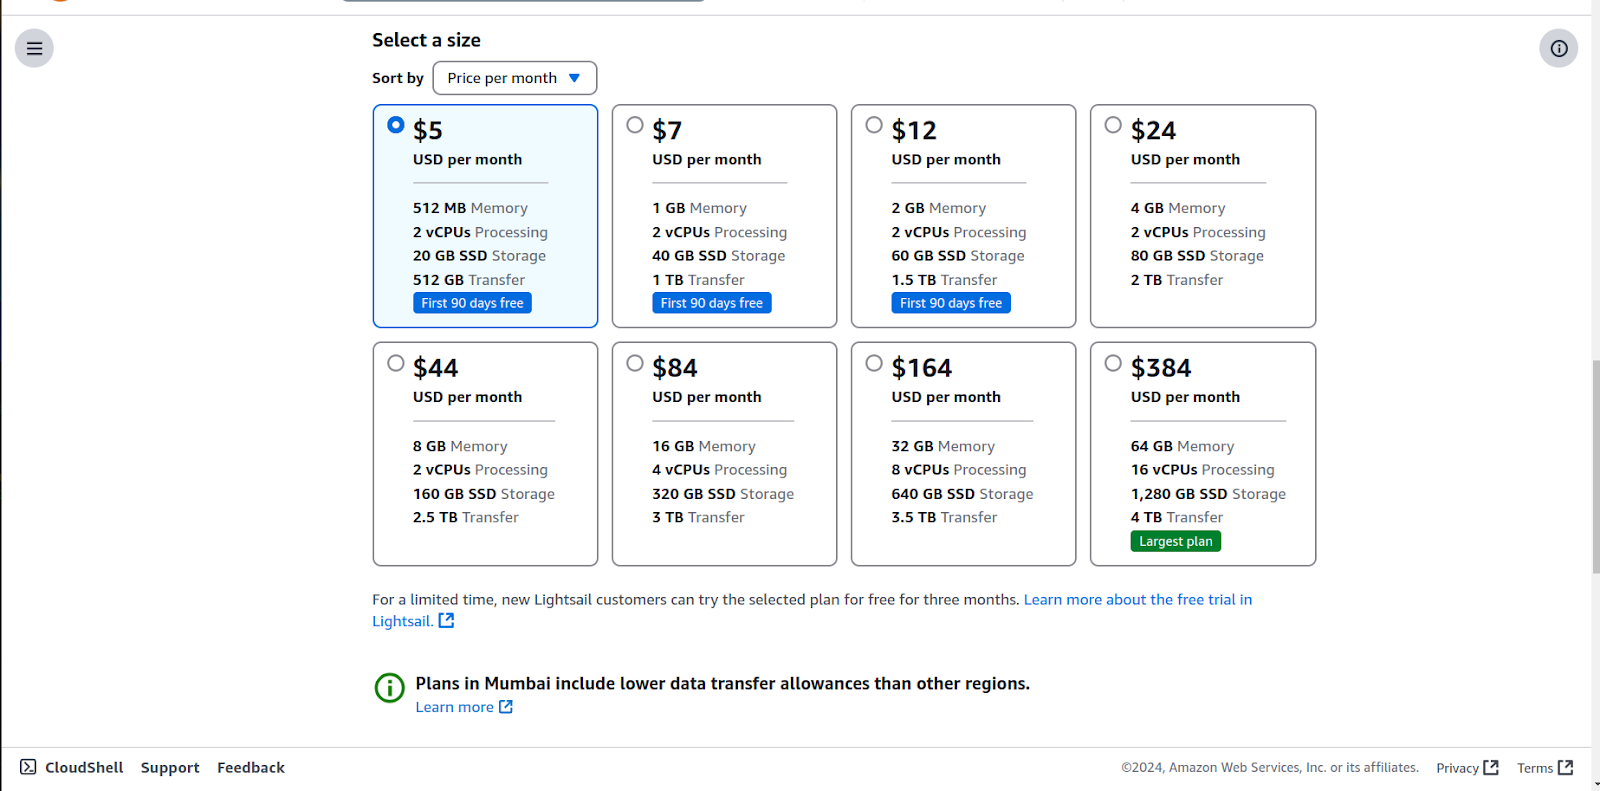
- Choose the suitable plan you want
- Use 24$ plan that is enough for basic usage
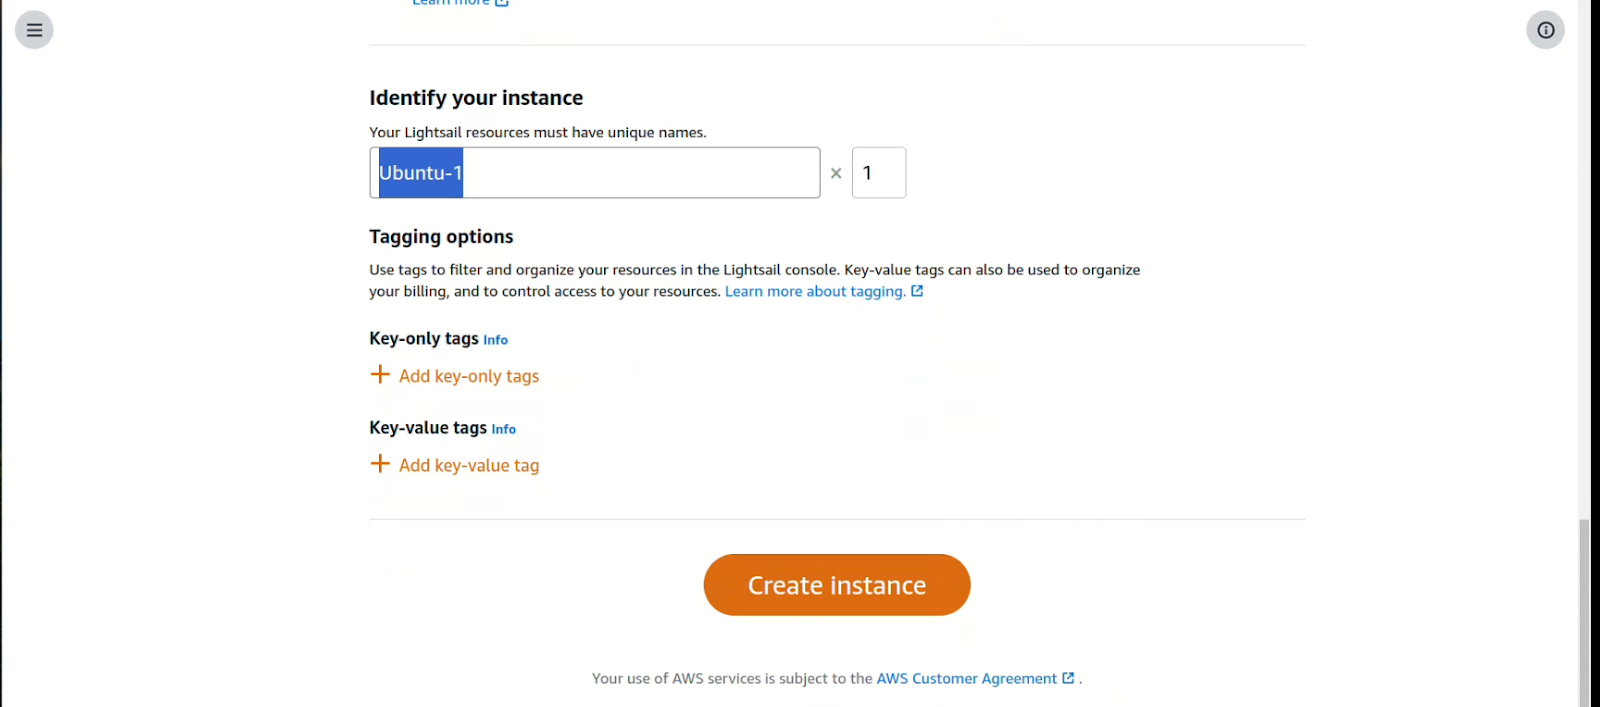
- In identifying your instance we want to give the name of the instance (eg client name or project name)
- Instead of Ubuntu change the name
- Click Create Instance to complete the instance process

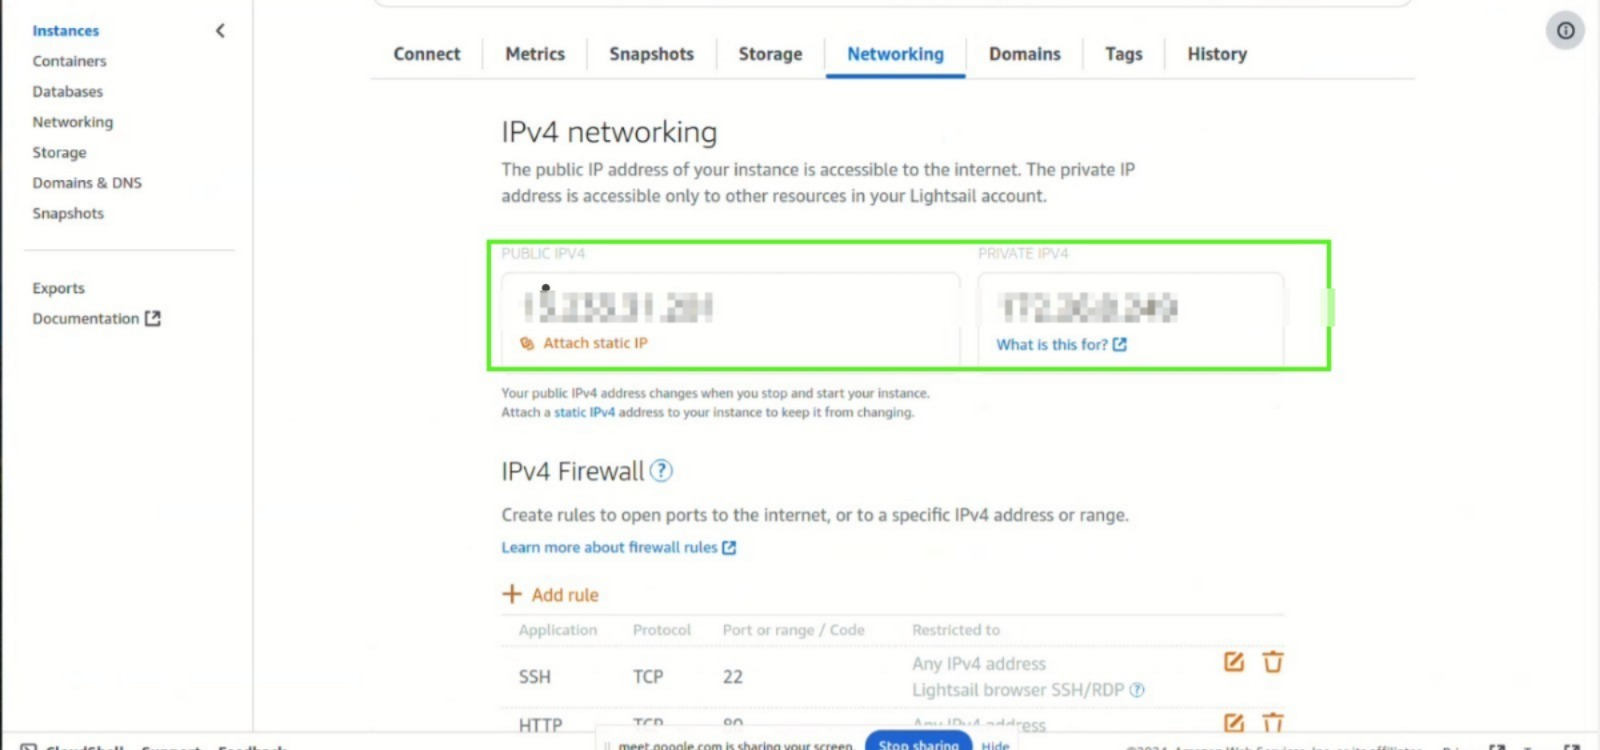
Step:5 Set the network
- Once get into that go to the network tab
- In that, you can see the IP address. This IP will change every login so we need to set the IP as a static IP
- Click the Attach static IP to set (static IP)
- After that click on the add rule in this we will set the ports like HTTPS.
- Now the port update and static IP are successfully updated
- Then test the IP in your local host.
Step 6: SSH connection
- In vs-code go to connect to the host
- Before that, we want to give access to pem file
- Open the terminal get into the pen file folder and give this command #sudo chmod 600 (pem name)
- Go to the vs-code and connect to the host
- Paste the IP address
- That will create ssh configuration for that IP
- Host Host 1
- HostName XXXXXXX
- IdentityFile (Path to pem file)
- User ubuntu
Step 7: once done go to terminal in vs code

Step 8: create a user and permit the user by the below command
sudo adduser [frappe-user]
usermod -aG sudo [frappe-user]
su [frappe-user]
cd /home/[frappe-user]
the server-side process is completed
Installation process
- Now we want to install the setup
- Based on the D-code or code with the Karani document to install the prerequisites and bench.
- Here I use D-code documents -https://github.com/D-codE-Hub/Frappe-ERPNext-Version-15--in-Ubuntu-22.04-LTS
- The video is also there to set- https://youtu.be/TReR0I0O1Xo
Steps to follow :
Frappe-ERPNext Version-15 in Ubuntu 22.04 LTS
A complete Guide to Install Frappe/ERPNext version 15 in Ubuntu 22.04 LTS
Refer to this for the default Python 3.11 setup
Pre-requisites
Python 3.11+
Node.js 18+
Redis 5 (caching and real-time updates)
MariaDB 10.3.x / Postgres 9.5.x (to run database-driven apps)
yarn 1.12+ (js dependency manager)
pip 20+ (py dependency manager)
wkhtmltopdf (version 0.12.5 with patched qt) (for pdf generation)
cron (bench's scheduled jobs: automated certificate renewal, scheduled backups)
NGINX (proxying multitenant sites in production)
Steps to Install Python 3.11.xx
Note: If you use Ubuntu 23. xx or the latest, the default Python version is 3.11.xx. So you can skip the Python 3.11 installation steps
First, import the Python repository with the most up-to-date stable releases.
sudo add-apt-repository ppa:deadsnakes/ppa -y
sudo apt update
installs Python 3.11 by executing the following command in your terminal:
sudo apt install python3.11
python3.11 --version
To install all the extras in one go, run the following command.
sudo apt install python3.11-full
Refer to this for the default Python 3.11 setup
STEP 1 Install git
sudo apt-get install git
STEP 2 install python-dev
sudo apt-get install python3-dev
STEP 3 Install setup tools and pip (Python's Package Manager).
sudo apt-get install python3-setuptools python3-pip
STEP 4 Install virtualenv
sudo apt install python3.11-venv
STEP 5 Install MariaDB
sudo apt-get install software-properties-common
sudo apt install mariadb-server
sudo mysql_secure_installation
To log into MariaDB to secure it, we'll need the current
password for the root user. If you've just installed MariaDB, and
haven't set the root password yet, you should just press enter here.
Enter current password for root (enter for none): # PRESS ENTER
OK, successfully used the password, moving on...
Switch to unix_socket authentication [Y/n] Y
Enabled successfully!
Reloading privilege tables…
... Success!
Change the root password? [Y/n] Y
New password:
Re-enter new password:
Password updated successfully!
Reloading privilege tables..
... Success!
Remove anonymous users? [Y/n] Y
... Success!
Disallow root login remotely? [Y/n] Y
... Success!
Remove the test database and access it. [Y/n] Y
- Dropping test database...
... Success!
- Removing privileges on test database...
... Success!
Reload privilege tables now? [Y/n] Y
... Success!
STEP 6 MySQL database development files
sudo apt-get install libmysqlclient-dev
STEP 7 Edit the MariaDB configuration ( Unicode character encoding )
sudo nano /etc/mysql/mariadb.conf.d/50-server.cnf
add this to the 50-server.cnf file
[server]
user = mysql
pid-file = /run/mysqld/mysqld.pid
socket = /run/mysqld/mysqld.sock
basedir = /usr
datadir = /var/lib/mysql
tmpdir = /tmp
lc-messages-dir = /usr/share/mysql
bind-address = 127.0.0.1
query_cache_size = 16M
log_error = /var/log/mysql/error.log
[mysqld]
innodb-file-format=barracuda
innodb-file-per-table=1
innodb-large-prefix=1
character-set-client-handshake = FALSE
character-set-server = utf8mb4
collation-server = utf8mb4_unicode_ci
[mysql]
default-character-set = utf8mb4
Now press (Ctrl-X) to exit
sudo service mysql restart
STEP 8 Install Redis
sudo apt-get install redis-server
STEP 9 Install Node.js 18. X Package
sudo apt install curl
curl https://raw.githubusercontent.com/creationix/nvm/master/install.sh | bash
source ~/.profile
nvm install 18
STEP 10 install Yarn
sudo apt-get install npm
sudo npm install -g yarn
STEP 11: install wkhtmltopdf
sudo apt-get install xvfb libfontconfig wkhtmltopdf
STEP 12: install frappe-bench
sudo -H pip3 install frappe-bench
bench --version
STEP 13: initilise the frappe bench & install frappe latest version
bench init frappe-bench --frappe-branch version-15 --python python3.11
cd frappe-bench/
Step 14: Production setup command
sudo bench setup production [frappe-user]
Site and app installation and setup
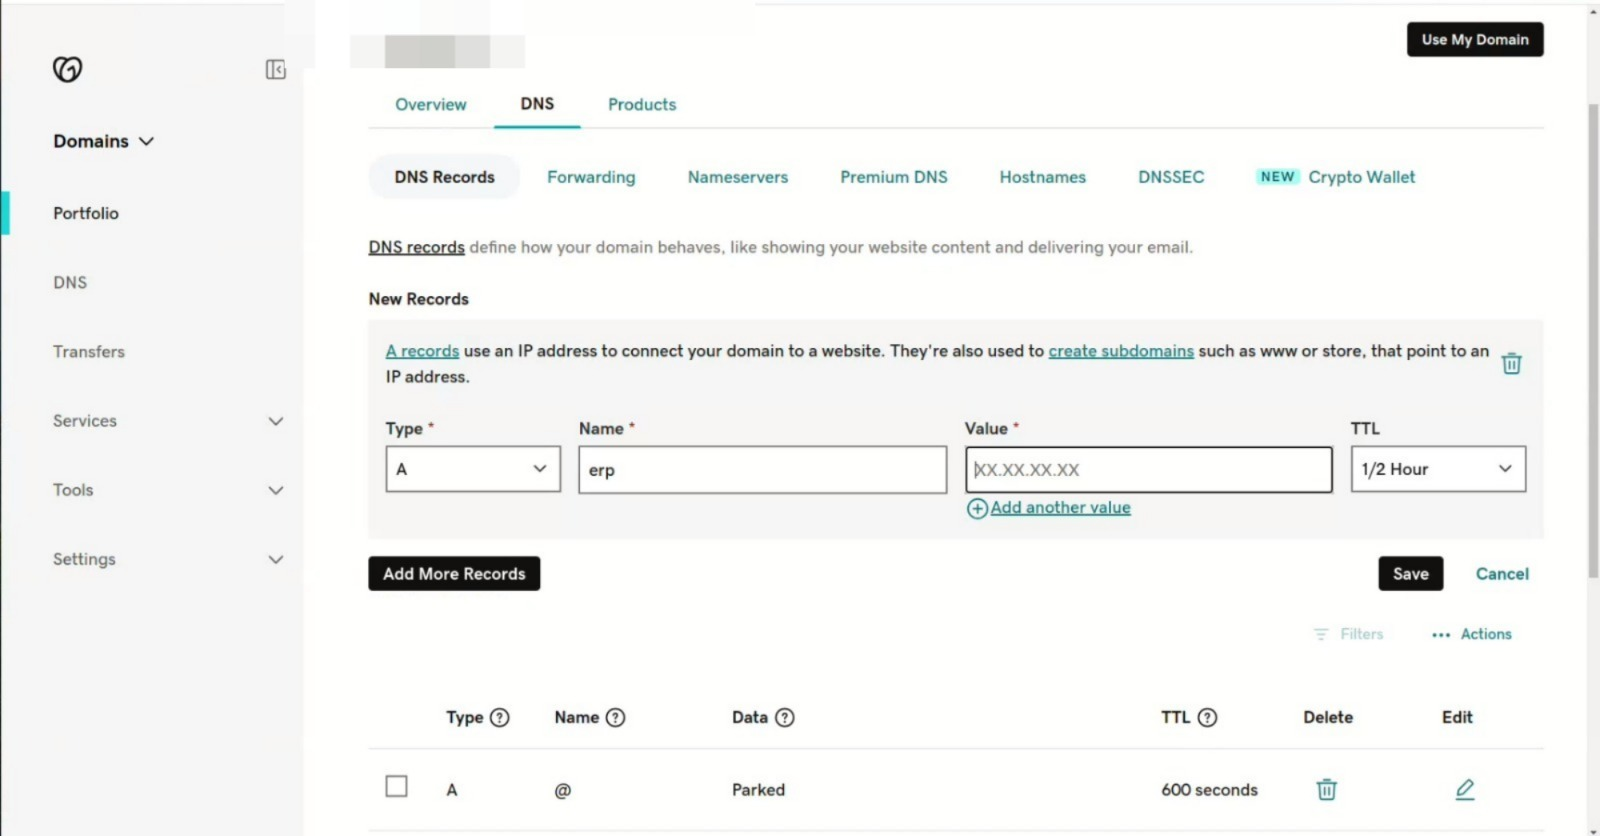
Domain setup:
- Login to the domain or buy a new domain
- Go to DNS records
- Mark the IP with point “A”
- Once done check with -https://www.nslookup.io/
- For checking whether the domain is created or not(It may take some time)
- After this go to vs-code connect with ssh and open the terminal.
- Switch into frappe user and permitted by this command - chmod o+x /home/frappe
- Go to the frappe bench
- Create a new site by this command - bench new-site site name
- Add site password
- Install wanted apps by this command -bench get-app app name --branch v-15
- Install Basic apps like Erpnext, Hrms, India_compliance, Payments
- After that install the app on the site by this command -bench --site (site name) install-app (app name)
- Once done Use certbot to get a license for HTTPS service
- Install Certbot
- Run this command on the machine's command line to install Certbot.
sudo snap install --classic certbot
- Prepare the Certbot command
- Execute the following instructions on the machine command line to ensure that the certbot command can be run.
sudo ln -s /snap/bin/certbot /usr/bin/certbot
- Choose how you'd like to run Certbot
- Either get and install your certificates...
- Run this command to get a certificate and have Certbot edit your Nginx configuration automatically to serve it, turning on HTTPS access in a single step.
sudo certbot --nginx
Site migration and bench restart
- Migrate the site with this command
bench --site {site name} migrate.
- Restart the bench
bench restart
Conclusion
Setting up a production environment on AWS requires careful planning and execution. Following this guide can ensure a robust deployment with secure configurations, optimized performance, and automated processes. AWS offers flexibility and scalability, making it ideal for hosting applications like Frappe/ERPNext. As you move forward, consider implementing additional security measures, auto-scaling strategies, and continuous monitoring to maintain a stable and efficient production environment.
No comments yet. Login to start a new discussion Start a new discussion